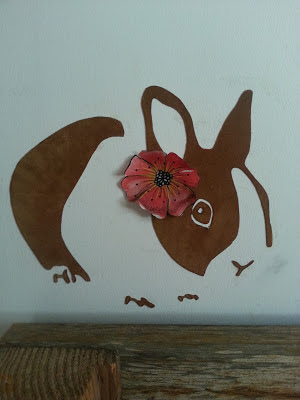
After the craze of vinyl wall stickers from last year, and a fair share of self made stickers of my own, I'm a bit tired from that flat look vinyl has...Yet, I still want something original to decorate my kid's room...DILEMMA
So what can one do to keep that cool neat look of vinyl wall stickers,but make it more interesting ...maybe with some texture or pattern?!
Well,with the help of Silhouette cutter and my awesome XYRON's Creatopia machine loaded with fabric adhesive cartridge , I can easily make FABRIC wall stickers and catch two birds in one hand- have the neat silhouette look WITH a texture !!!
All you need to make your own original Fabric Wall sticker is-
- Black & White artwork in png format (or vector file)- I used my original Rabbit Silhouette design
- A Silhouette cutter +Silhouette Studio software
- Creatopia machine w/fabric adhesive cartridge and Repositionable adhesive cartridge
- Fabric of your choice - I used heavy weight denim backed with suede
- Plain Cardstock to cut a stencil of the rabbit for easy applying onto the wall
This is how you do it
Create an artwork in Photoshop or Illustrator (I work with Photoshop )
Save the file in PNG background free format
Open the file in Silhouette Studio
Trace the shape
Move the original PNG aside (unless you want to "print and cut" your own pattern/design onto fabric )
I didn't want to print my own pattern on the fabric this time and used a textured fabric instead
Now cut your fabric of choice to size -make sure it's slightly smaller than the cutting mat (you don't want the rollers of the cutter to go through the fabric-it moves it and can ruin your design!!! )
Select a proper setting to cut your fabric-I knew from the begin with ,that Silhouette won't be able to cut through the very thick material I'd choose,but I was o.k with it-as long as the blade will trace the shape to the fabric,I'm all good.
If you are choosing a thick suede like I did,then just stick it on top of your mat and hit the cut button ...When you will unload the cutting mat ,you'll see a subtle outline engraved into the suede .
However, if you are going with a light cotton, you'll need to bake it to a freezer paper first,to give it a stability and then stick and cut it with your cutter
Then after cut the same shape again,this time from plain cardstock -this will be your guideline stencil
When you finished cutting /engraving , run the soon to be wall sticker fabric shape through your Creatopia
* I first run the whole fabric through and only after, I cut according to the outline
That's it, your fabric shape is ready to be glued to your wall
NOTE:: Before you attempt to glue the cut design, run the cardstock stencil through Creatopia loaded with Repositionable adhesive cartridge ,apply the cardstock stencil to the wall and now ,when you can easily see where all the separate shapes of your figure should be glued at,go ahead, and adhere the fabric shape to the wall
You can also make a 3D freehand drawn decorations to embellish your wall art sticker!!!
Just apply a fabric stiffener of your choice to your fabric scraps ,and when dry,doodle a design
colour it
Attach the new Xyron High Tack Glue Dots on the center back and let your kids dress the rabbit :)
I think a repositionable tutu can be super cute too-don't you think?!


Just love it, the different colours and shapes. Finding it hard to choose which one I like the most ermmm if I could I would have all of them xx
ReplyDeletefrom:cut it out wall stickers
Wall Kraft Design Company provides Wall Stickers UK, Wall Stickers Décor in affordable price in the UK. Wall stickers in various colors, styles and sizes
ReplyDeletecontact id :- info@wallkraftdesign.co.uk
This sounds like a fun way to add some texture and personality to my walls.
ReplyDeleteCanvas art that looks premium large canvas prints
ReplyDelete